Saturday 24 September 2011

JNLP Application Security Assessment – Part 4 : Dynamic analysis

Hello all,

This is the last part of the JNLP Application Security Assessment, Part 4 Dynamic Analysis. In this part we will attack the authentication and authorisation flaw depicted in the previous post.

[sourcecode lang="java"]
ActionListener listener = new ActionListener() {
public void actionPerformed(ActionEvent actionEvent) {
String un = usernameTxt.getText();
String pw = passwordTxt.getText();
if (authenticate(un , pw ))
{
buildGUI( un );
}
};
};
[/sourcecode]

Using a java debugger and a java bytecode editor the following two attacks will be performed:

  1. Edit the .class file in order to disregard any authentication outcome and build a gui provided a valid username is returned.

  2. Use a debugger to alter the  value of the un variable between the two calls in order to authenticate with one user but gain the privileges of another (normal user to admin elevation).

Authentication bypass (ByteCode Injection)

For this scenario JavaByteCode Editor from http://www.cs.ioc.ee/~ando/jbe/ will be used.


  • First, open the JNLPFrame.class in JBE and navigate to the authenticate function.


  • You can see that it is returning the integer outcome of the com/jnlptest/Auth2Service/authenticate method. This will either be 0 (false) or 1 (true) depending on whether the username and password provided are correct or not. ireturn will return the top item in the stack.

  • We can manipulate this by adding a constant 1 to the top of the stack prior to the ireturn statement as follows and hit the "Save Method" button


  • Executing now the sample application loads the interface associated with our user regardless of the typed password.


Authorisation Bypass (Debugging).

For this scenario we will execute the sample application with the debug directive and later attach a debugger to it in order to manipulate its runtime. For this the JSwat tool from http://sourceforge.net/projects/jswat/ will be used.

First lets manipulate the sample application start command to start with the debug directive, open a socket to which our debugger will attach and start in the suspended state (-agentlib directive).
C:\analysis2\bin>java -Xnoclassgc -Djnlp.versionEnabled=true -esa -agentlib:jdwp=transport=dt_socket,server=y,address=8000 com.jnlptest.TestJnlp

Depending on the java version, different directives may be required or there may be multiple ways to set this up. The aforementioned works for java 1.6/1.5.

So once this is executed the jvm sits in suspended mode and waits for out debugger to be attached.

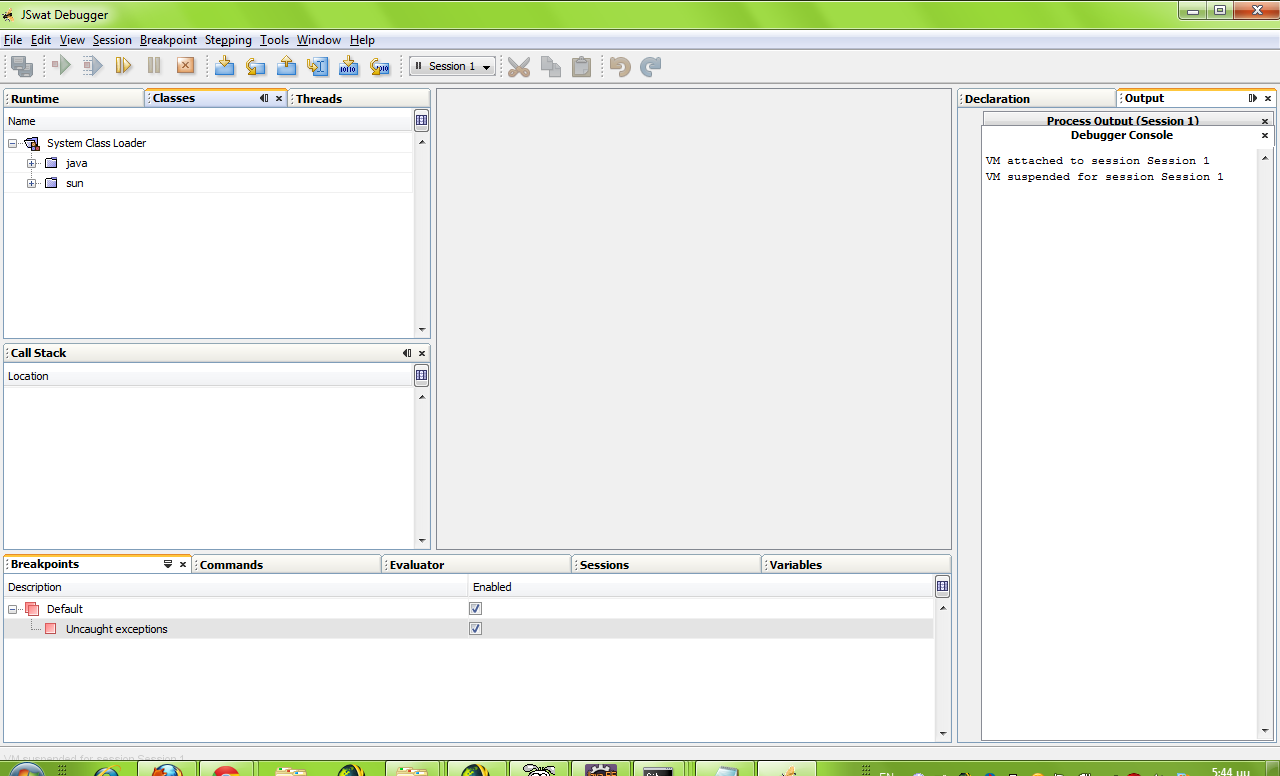
So we start jswat and attach to the suspended process in the network port that was declared above (8000). Once it has attached there is the option to attach the sources as well via the session properties. Doing so will make our life a lot easier since it will provide us with realtime access to variables and the call stack.
If attaching the sources is not an option for whatever reason (eg. maybe the decompilation process did not complete correctly from some or all of the classes), not everything is lost. You can still attach to the process see class names and set breakpoints, but before seeing variables and the call stack you must go to the Threads tab and set the current thread as "Current". You may occasionally have to close the Variables tab and reopen it since it does not refresh properly at each set breakpoint.

Furthermore you need to go to the Window -> Debugging menu option and enable the Evaluator and Command tabs.

So after starting the sample application:

  • Start jswat and attach to the process.

  • Hit the continue button (At this point the application login screen will appear)


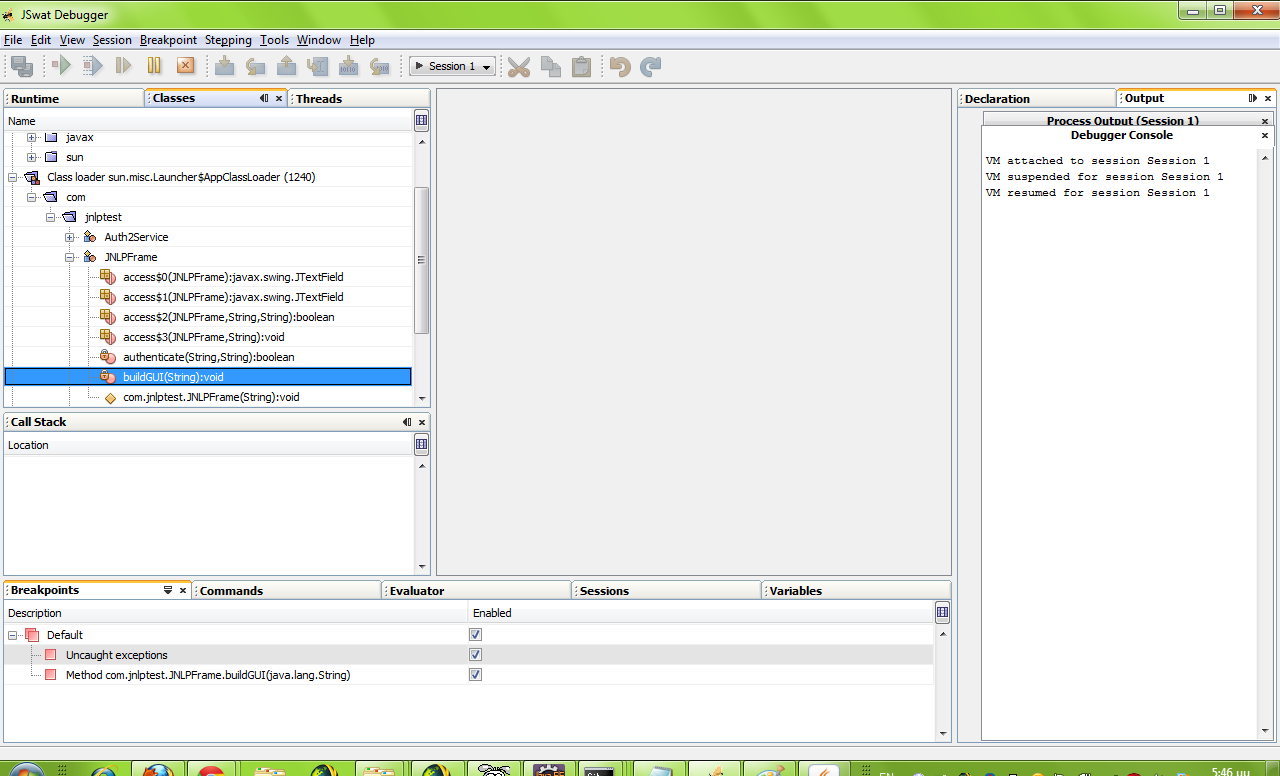
  • Find the buildgui method and set the breakpoint


  • Use the session -> settings -> source menu options to point to the folder where the source files are

  • Fill in the normal user credentials and press the Login button.

  • The breakpoint is hit (assuming you entered the correct credentials).

  • The Variables window shows the variables in play.

  • Use the Evaluator window to alter the u parameter to "admin"


  • Hit continue and the administrator related functions will be made available.


The aforementioned is meant only as a guide to what you can do with a java debugger and how you can manipulate an application at runtime. The more you familiarise yourself with the debugger and its functions the more fun you can have with it and the tested application.

This concludes the 4th and last post on attacking jnlp applications.

I hope it proves a valuable resource to someone as it will be to me at some future point.
./Z

JNLP Application Security Assessment - Part 3 : Application decomposition / Static analysis

Hello All,

Now, off to Part 3 of the series.

At this point, we have downloaded and extracted all the required jars from the remote site and we have the required command for launching the application.  No it is time to decompile the class files and see how they look like from a source code perspective. At this point we will also identify any client side application protections that have been applied to the application itself such as code obfuscation. Code obfuscation is usually incorporated in an application as an intellectual property rights protection mechanism - to prevent the source code from disclosure. However it can moonlight as a protection scheme, albeit basic, against static analysis in order to make the analysts job a bit more difficult.

For java code decompilation two tools stand out, jad and java decompiler, that can be downloaded from the below locations respectively.

http://www.varaneckas.com/jad

http://java.decompiler.free.fr/

Java decompiler is an actively maintained tool that comes in three main flavors, a library that can be used as a reference to projects, a standalone decompiler and an eclipse plugin. It can work on jar files and can output the corresponding source code of a jar file in a corresponding zip archive. The screenshot below shows java decompiler in action against our two jar files, gui.jar & logic.jar.


Jad is a bit outdated but contains a few useful features such as batch decompilation of class files in a directory structure, usage of fully qualified class names and the ability to generate java bytecode as comments to the produced .java source files. Jad's help is shown below.
C:\analysis>..\jad158g.win\jad.exe

Jad v1.5.8g. Copyright 2001 Pavel Kouznetsov (jad@kpdus.com).
Usage: jad [option(s)] <filename(s)>
Options: -a - generate JVM instructions as comments (annotate)
-af - output fully qualified names when annotating
-b - generate redundant braces (braces)
-clear - clear all prefixes, including the default ones
-d <dir> - directory for output files
-dead - try to decompile dead parts of code (if there are any)
-dis - disassembler only (disassembler)
-f - generate fully qualified names (fullnames)
-ff - output fields before methods (fieldsfirst)
-i - print default initializers for fields (definits)
-l<num> - split strings into pieces of max <num> chars (splitstr)
-lnc - output original line numbers as comments (lnc)
-lradix<num>- display long integers using the specified radix
-nl - split strings on newline characters (splitstr)
-noconv - don't convert Java identifiers into valid ones (noconv)
-nocast - don't generate auxiliary casts
-noclass - don't convert .class operators
-nocode - don't generate the source code for methods
-noctor - suppress the empty constructors
-nodos - turn off check for class files written in DOS mode
-nofd - don't disambiguate fields with the same names (nofldis)
-noinner - turn off the support of inner classes
-nolvt - ignore Local Variable Table entries (nolvt)
-nonlb - don't insert a newline before opening brace (nonlb)
-o - overwrite output files without confirmation
-p - send all output to STDOUT (for piping)
-pa <pfx>- prefix for all packages in generated source files
-pc <pfx>- prefix for classes with numerical names (default: _cls)
-pe <pfx>- prefix for unused exception names (default: _ex)
-pf <pfx>- prefix for fields with numerical names (default: _fld)
-pi<num> - pack imports into one line using .* (packimports)
-pl <pfx>- prefix for locals with numerical names (default: _lcl)
-pm <pfx>- prefix for methods with numerical names (default: _mth)
-pp <pfx>- prefix for method parms with numerical names (default:_prm)
-pv<num> - pack fields with the same types into one line (packfields)
-r - restore package directory structure
-radix<num>- display integers using the specified radix (8, 10, or 16)
-s <ext> - output file extension (default: .jad)
-safe - generate additional casts to disambiguate methods/fields
-space - output space between keyword (if, while, etc) and expression

-stat - show the total number of processed classes/methods/fields
-t<num> - use <num> spaces for indentation (default: 4)
-t - use tabs instead of spaces for indentation
-v - show method names while decompiling
-8 - convert Unicode strings into ANSI strings (ansi)
-& - redirect STDERR to STDOUT

The following snippet shows jad in action in parsing our two archives and generating the relevant source code.
C:\analysis>..\jad158g.win\jad.exe -d jadsrc -f -r -s .java .\**\*.class
Parsing .\com\jnlptest\Auth2Service.class... Generating jadsrc\com\jnlptest\Auth
2Service.java
Parsing .\com\jnlptest\JNLPFrame.class...Parsing inner class .\com\jnlptest\JNLP
Frame$1.class...Parsing inner class .\com\jnlptest\JNLPFrame$2.class...Parsing i
nner class .\com\jnlptest\JNLPFrame$3.class... Generating jadsrc\com\jnlptest\JN
LPFrame.java
Parsing .\com\jnlptest\TestJnlp.class... Generating jadsrc\com\jnlptest\TestJnlp
.java

C:\analysis>

So, now that we have generated the source code and have asserted that it is not in obfuscated form we can perform static analysis either manually or through the use an automated tool. Given the size and complexity (or lack thereof ) of our application not much can be shown at this point, however the procedure can be followed for any size application.

For illustration purposes we will use findbugs and pmd, two of the most well known open source java source code analysers on our generated source code.
Both of the aforementioned tools are general purpose source code analysers and although the have some capabilities regarding security oriented source code analysis they are not exactly there yet, at least in terms of taint and flow analysis. You can try OWASP for a few projects that can help in this direction, TeSA and LAPSE the most notable, or the CodePro Analytix from the Google Web Toolkit http://code.google.com/javadevtools/codepro/doc/features/audit/audit_details.html .

Findbugs and pmd can be downloaded respectively from the following locations.

In order to run findbugs the source code is not a strict prerequisite, however if the source code is provided it can aid the reviewer by indicating the exact source code responsible for each finding.

The two screenshots below show the output of both findbugs and pmd when run against our simple application.


Of course, not all things can be found via automatic scanning, either security or non-security oriented. There is a specific vulnerability that can be found in the sample application that I doubt any of the automated tools would be able to find out. Lets have a look.

[sourcecode lang="java"]
ActionListener listener = new ActionListener() {
public void actionPerformed(ActionEvent actionEvent) {
String un = usernameTxt.getText();
String pw = passwordTxt.getText();
if (authenticate(un , pw ))
{
buildGUI( un );
}
};
};
[/sourcecode]

This vulnerability exists in lines 49-58 of JNLPFrame.java and is the action listener attached to the Login button. It tries to authenticate the user and upon success builds the user interface according to the username (ultimately the attached role to that username). Of course since this is client side there are a few ways that we can intervene with it and this will be the focus of Part 4 of the series.

./Z

JNLP Application Security Assessment – Part 2 : Runtime Mapping of a JNLP Application

Hello All,

For Part 2 of our series we will map all actions that take place when a jnlp application is launched. Finally at the end of the post we will change the execution mode of our application from jnlp to a normal java application running locally on our workstation.

Step 1. Network traffic

The following is a network traffic extract that depicts what is happening from a networking point of view. Wireshark was used to capture the traffic.

All network communications.


Download of jnlp file.


Download of additional jars.


Step 2. Workstation activity.

In parallel to the above network interaction, events are taking place in the local workstation as well. To map those actions we will use two tools, Microsoft's Process  Monitor (ProcMon) and the native sun java plugin control panel. Prior to clicking the jnlp shortcut the following actions need to take place:

  1. Enable the java console for every java application execution (java control panel -> advanced -> java console -> Show console).

  2. Find out the location of the temporary internet files (java control panel -> general -> temporary internet files -> settings).

  3. Start ProcMon and apply the following filters in order to eliminate "noise".

  4. Process Name is "javaws.exe"

  5. Path Starts With "whatever you gathered from point 2 above"


Now you are ready to the click the jnlp application link and launch it.

The first you are phased with is the java console popping on the background. You need to click on the console and press 5 in order to enable tracing of the application execution. This will give you a view of the application execution from the java vm standpoint. From this window you can gather the following information:

  • java vm execution parameters parapeters as passed to the javaws.exe (passed and accepted - the two won't always map)

  • all properties passed to the application.


So, for our test application this equates to the following:


From the ProcMon you can see that the jar files are being downloaded, placed in the java temporary internet files location and the jar indexes are being created. They will appear in XXXXXXXXX-XXXXXXXX & XXXXXXXXX-XXXXXXXX.idx format.
You can run the javaws.exe -viewer command in order to verify that all required files have been downloaded to the temporary folder.

You can gather which of the files in the temporary internet folder correspond to the tested application and collect them for further examination.
The reason for the above process is to be able to gather the jar files and later decompile them so that you can get access to the source code. Halfway down the process, I thought "why don't I download them from the webserver they are hosted one, since I have the links in the jnlp files" and gave up on the aforementioned method. While not applicable in this scenario it is recommended to get to to grips with the ProcMon executable since it has proven valuable in many occasions.

Apart from the downloaded and stored jar files, ProcMon will also show any other O/S level interactions of the jnlp application, they will appear as originating from the javaws.exe executable.

So at this point we have:

  1. a list of all required jar files in order to execute the application

  2. the name of the main class

  3. the runtime arguments for the execution of the jnlp file.


Remember that the jnlp application is in its heart a normal java application. We can use all of the above data in order to change the execution model of the application from jnlp to a normal java application.


This will also give us more power as to how we will interact and attack its internals since there are options that while passed by manipulating the java-vm-args directive in the jnlp file they are discarded by the javaws.exe such as debug related options that require opening sockets for remote debugging.

So the process to change the execution model is the following:


  1. Download all referenced jar files from the webserver they are hosted on and store them in a single folder

  2. Extract them via jar.exe.-x

  3. Create a batch file that will mirror the execution command gathered by the java console step described previously.


The good thing is that now our executable will change from javaws.exe to java.exe (or javaw.exe), thus supporting more options to be passed to the application, such as debug directives.


C:\analysis>.\..\wget.exe http://127.0.0.1:8080/gui.jar
--2011-08-28 15:08:57-- http://127.0.0.1:8080/gui.jar
Connecting to 127.0.0.1:8080... connected.
HTTP request sent, awaiting response... 200 OK
Length: 6204 (6.1K) [application/x-java-archive]
Saving to: `gui.jar'

100%[======================================>] 6,204 --.-K/s in 0s

2011-08-28 15:08:57 (217 MB/s) - `gui.jar' saved [6204/6204]

C:\analysis>.\..\wget.exe http://127.0.0.1:8080/logic.jar
--2011-08-28 15:09:18-- http://127.0.0.1:8080/logic.jar
Connecting to 127.0.0.1:8080... connected.
HTTP request sent, awaiting response... 200 OK
Length: 2506 (2.4K) [application/x-java-archive]
Saving to: `logic.jar'

100%[======================================>] 2,506 --.-K/s in 0s

2011-08-28 15:09:18 (97.0 MB/s) - `logic.jar' saved [2506/2506]

C:\analysis>"C:\Program Files\Java\jdk1.6.0_18\bin\jar.exe" xvf gui.jar
inflated: META-INF/MANIFEST.MF
inflated: META-INF/ZQYVES.SF
inflated: META-INF/ZQYVES.DSA
created: META-INF/
inflated: com/jnlptest/JNLPFrame$1.class
inflated: com/jnlptest/JNLPFrame$2.class
inflated: com/jnlptest/JNLPFrame$3.class
inflated: com/jnlptest/JNLPFrame.class
inflated: com/jnlptest/TestJnlp.class

C:\analysis>"C:\Program Files\Java\jdk1.6.0_18\bin\jar.exe" xvf logic.jar
inflated: META-INF/MANIFEST.MF
inflated: META-INF/ZQYVES.SF
inflated: META-INF/ZQYVES.DSA
created: META-INF/
inflated: com/jnlptest/Auth2Service.class

C:\analysis>type run.bat
java -Xnoclassgc -Djnlp.versionEnabled=true -esa com.jnlptest.TestJnlp

C:\analysis>


That is it for this part of the series. Tune in for the next part of the series.

./Z

JNLP Application Security Assessment – Part 1 : Analysis of the JNLP file

Hello All,

Time for part 1 of our series.

During this part I will analyse all the sections of a typical .jnlp file. I understand that this may seem a bit of an overkill for a "JNLP Application Security Assessment" series of posts but it will provide a background to any reader that is not familiar with the structure and architecture of jnlp and Java WebStart.

Below is an brief description of what Java WebStart and jnlp is from Oracle.
The Java Network Launch Protocol (JNLP) enables an application to be launched on a client desktop by using resources that are hosted on a remote web server. Java Plug-in software and Java Web Start software are considered JNLP clients because they can launch remotely hosted applets and applications on a client desktop.

The main component of Java Web Start is the .jnlp file. It is an XML based file that

  1. instructs the java web start to take over the execution of the application,

  2. loads or downloads each required jar file - depending on whether it is the first time that the jnlp software is executed or not and the response from the web server when each jar file is requested (HTTP/1.1 304 Not Modified vs other)

  3. starts the java vm with the required execution parameters

  4. starts the java application with the required parameters & properties.


There are several explanations in the net regarding the structure of the jnlp file. The two best I have found are

The image below is itself taken from the Specification archive and is in my opinion a very precise and condensed presentation of the jnlp XML file structure

jnlp file overview

From the above elements the ones that are more significant from a security testing perspective are the following:

  1. security: It defines all runtime permissions that the jnlp application will have

  2. resources: All of its child elements are important


    1. j2se: defines the required runtime version as well as java vm options that need to be passed at runtime eg. max heap , debug , etc. They are defined in the java-vm-args directive inside the j2se child element.

    2. jar: defines all java archives that compose the application itself. Those are downloaded ad-hoc at first application execution or are checked for modifications by the runtime at each subsequent application execution

    3. property: defines all properties that need to passed to the application at runtime as well, those are passed via the to the java vm via the -Dpropertyname=value directive.

    4. package: defines which packages are implemented in which JAR files.

    5. nativelib:  defines a jar file that contains native libraries in it.


  3. application-desc: defines runtime parameters to the application The main are:


    1. The class that contains the main function

    2. arguments passed to the application


  4. application-desc: defines runtime parameters to the application The main are:


    1. The name of the main applet class

    2. params passed to the applet


Now that the foundations have been set, it is time to see a couple of real life examples that tie all of the above together.

[sourcecode language="xml"]
<?xml version="1.0" encoding="utf-8"?>
<!-- JNLP File for launching ArgoUML with WebStart -->
<jnlp
spec="1.0+"
codebase="http://argouml-downloads.tigris.org/maven2"
href="http://argouml-downloads.tigris.org/jws/argouml-latest-stable.jnlp">
<information>
<title>ArgoUML Latest Stable Release 0.32.2</title>
<vendor>Tigris.org (Open Source)</vendor>
<homepage href="http://argouml.tigris.org/"/>
<description>ArgoUML application.
This is the latest stable release.
</description>
<description kind="short">ArgoUML 0.32.2</description>
<icon href="http://argouml.tigris.org/images/argologo16x16.gif" width="16" height="16" />
<icon href="http://argouml.tigris.org/images/argologo32x32.gif" width="32" height="32" />
<icon href="http://argouml.tigris.org/images/argologo64x64.gif" width="64" height="64" />
<offline-allowed/>
</information>
<security>
<all-permissions/>
</security>
<resources>
<j2se version="1.5+" max-heap-size="512m"/>

<jar href="http://argouml-downloads.tigris.org/maven2/antlr/antlr/2.7.7-2/antlr-2.7.7-2.jar"/>
<jar href="http://argouml-downloads.tigris.org/maven2/org/argouml/argouml-euml/0.32/argouml-euml-0.32.jar"/>
... this application has a lot of jars ...
<jar href="http://argouml-downloads.tigris.org/maven2/org/argouml/argouml-umlpropertypanels/0.32.2/argouml-umlpropertypanels-0.32.2.jar"/>

<property name="argouml.modules"
value=";org.argouml.state2.StateDiagramModule;org.argouml.sequence2.SequenceDiagramModule;org.argouml.activity2.ActivityDiagramModule;org.argouml.core.propertypanels.module.XmlPropertyPanelsModule;org.argouml.transformer.TransformerModule;org.argouml.language.cpp.generator.ModuleCpp;org.argouml.language.cpp.notation.NotationModuleCpp;org.argouml.language.cpp.profile.ProfileModule;org.argouml.language.cpp.reveng.CppImport;org.argouml.language.cpp.ui.SettingsTabCpp;org.argouml.language.csharp.generator.GeneratorCSharp;org.argouml.language.java.cognitive.critics.InitJavaCritics;org.argouml.language.java.generator.GeneratorJava;org.argouml.language.java.profile.ProfileJava;org.argouml.language.java.reveng.JavaImport;org.argouml.language.java.reveng.classfile.ClassfileImport;org.argouml.language.java.ui.JavaTools;org.argouml.language.java.ui.SettingsTabJava;org.argouml.language.php.generator.ModulePHP4;org.argouml.language.php.generator.ModulePHP5;org.argouml.language.sql.SqlInit;org.argouml.uml.reveng.classfile.ClassfileImport;org.argouml.uml.reveng.idl.IDLFileImport"    />
</resources>
<application-desc main-class="org.argouml.application.Main"/>
</jnlp>
[/sourcecode]

Following on our definition of interesting sections, we can see that the jnlp file has:

  1. all available security permissions to perform any actions on the users' workstation (Lines 20 - 22)

  2. It requires java 1.5 and greater to function as well as a maximum heap size of 512 MB (Line 24)

  3. It requires a lot of jars that will be downloaded and saved at the users' workstation (Lines 26 - 29)

  4. A single property is passed to it at runtime, argouml.modules (Line 31).

  5. Its main function is loaded from org.argouml.application.Main and a single parameter is passed to it (Line 34)


Another jnlp file with interesting parameters is the one below from the javaemvreader project:

[sourcecode language="xml"]
<!--?xml version="1.0" encoding="utf-8"?--><?xml version="1.0" encoding="utf-8"?>
<jnlp  spec="1.6+" codebase="http://javaemvreader.googlecode.com/files/" href="webstart.jnlp">
<information>
<title>Java EMV Reader</title>
<vendor>sasc</vendor>
<homepage href="http://code.google.com/p/javaemvreader"/>
<description>Java EMV Reader</description>
<offline-allowed/>
</information>
<security>
<all-permissions/>
</security>
<resources>
<j2se version="1.6+" java-vm-args="-esa -Xnoclassgc"/>
<property name="jnlp.versionEnabled" value="true"/>
<jar href="javaemvreader-latest-full.jar" main="true"/>
</resources>
<application-desc main-class="sasc.Main"/>
</jnlp>
[/sourcecode]

The interesting bit here is the java-vm-args directive at the j2se section. Basically it is used to initiate the java virtual machine with the appropriate configuration settings and ensure a correct execution environment.

That is it for Part 1 of our tutorial. Part 2 will describe the behavior of a jnlp file execution, ways to interfere with is by manipulation some of its critical parameters and changing the execution model from Java WebStart to native java application.

./Z

JNLP Application Security Assessment - Setting the scene

Hello all,

Some time ago I came across assessing a JNLP application. Since my initial search for some guidance on the web turned no valuable results I thought I would use a few blog posts to document my  process of performing the aforementioned assessment and provide some guidance to people in search of a similar document in the future.

The list below will turn to actual blog posts as the process moves along.

The rough structure of the posts is the following:

  • JNLP Application Security Assessment - Part 1 : Analysis of a typical JNLP file

  • JNLP Application Security Assessment - Part 2 : Runtime Mapping of a JNLP Application

  • JNLP Application Security Assessment - Part 3 : Application decomposition / Static analysis

  • JNLP Application Security Assessment - Part 4 : Dynamic analysis


To illustrate the various points I will use a sample application that consists of the following three files:

Auth2Service.java: This file handles all Authentication and Authorisation concepts of our application. In normal complex applications this component will most likely contain calls to the central component of the application, this may be a database, a corba server, a SOA endpoint, etc.

[sourcecode lang="java"]
package com.jnlptest;

import java.util.*;

public class Auth2Service {
private Map<String, String> logins = new HashMap<String,String>();
private Map<String, String> roles = new HashMap<String,String>();

public Auth2Service()
{
logins.put("admin", "admpwd");
logins.put("user", "userpwd");

roles.put("admin", "administrator");
roles.put("user", "normaluser");
}

public boolean authenticate( String u , String p)
{
if (!logins.containsKey( u ))
{
return false;
}
else
{
if (logins.get( u ).equals(p))
{
return true;
}
else
{
return false;
}
}
}

public String getrole( String u )
{
if (!roles.containsKey( u ))
{
return null;
}
else
{
return (String)roles.get( u );
}
}
}
[/sourcecode]

JNLPFrame.java: This file is the JFRAME that provides the GUI for our application.

[sourcecode lang="java"]
package com.jnlptest;

import java.awt.*;
import javax.swing.*;

import java.awt.event.ActionListener;
import java.awt.event.ActionEvent;

public class JNLPFrame extends JFrame {

private JLabel ulabel = new JLabel();
private JTextField usernameTxt = new JTextField();
private JLabel plabel = new JLabel();
private JTextField passwordTxt = new JTextField();
private JButton button = new JButton("Login");
private JButton admbutton = new JButton("Admin Function");
private JButton userbutton = new JButton("User Function");
private Auth2Service a2s = new Auth2Service();

public JNLPFrame(String title)
{
super(title);
setDefaultCloseOperation(JFrame.EXIT_ON_CLOSE);
Container content = getContentPane();
content.setLayout(new GridBagLayout());
GridBagConstraints c = new GridBagConstraints();

ulabel.setText("Username:");

c.gridx = 0;
c.gridy = 0;
content.add(ulabel,c);

c.gridx = 1;
c.gridy = 0;
c.fill = GridBagConstraints.HORIZONTAL;
content.add(usernameTxt,c);

plabel.setText("Password:");
c.gridx = 0;
c.gridy = 1;
content.add(plabel,c);

c.gridx = 1;
c.gridy = 1;
c.fill = GridBagConstraints.HORIZONTAL;
content.add(passwordTxt,c);

ActionListener listener = new ActionListener() {
public void actionPerformed(ActionEvent actionEvent) {
String un = usernameTxt.getText();
String pw = passwordTxt.getText();
if (authenticate(un , pw ))
{
buildGUI( un );
}
};
};
button.addActionListener(listener);

c.gridx = 1;
c.gridy = 2;
content.add(button, c);

ActionListener admlistener = new ActionListener() {
public void actionPerformed(ActionEvent actionEvent) {
JOptionPane.showMessageDialog(null, "Administrative action");
};
};

admbutton.addActionListener(admlistener);
admbutton.setVisible(false);
c.gridx = 0;
c.gridy = 3;
content.add(admbutton, c);

ActionListener userlistener = new ActionListener() {
public void actionPerformed(ActionEvent actionEvent) {
JOptionPane.showMessageDialog(null, "Normal user action");
};
};

userbutton.addActionListener(userlistener);
userbutton.setVisible(false);
c.gridx = 1;
c.gridy = 3;
content.add(userbutton, c);

pack();
setVisible(true);
}

private boolean authenticate(String u, String p)
{
return a2s.authenticate( u, p );
}

private void buildGUI(String u)
{
String role = a2s.getrole( u );
if (role.equals("normaluser"))
{
userbutton.setVisible(true);
pack();
}
else if (role.equals("administrator"))
{
userbutton.setVisible(true);
admbutton.setVisible(true);
pack();
}

}
}
[/sourcecode]

TestJnlp.java: This file is the application bootstrap. It contains the main() function that initialises the application GUI.

[sourcecode lang="java"]
package com.jnlptest;

public class TestJnlp {

public static void main(String args[]) {
JNLPFrame jf = new JNLPFrame("JNLP Test Application");
}
}
[/sourcecode]

TestJnlp.jnlp: This file is the JNLP definition. It it the main file served from the web server prior to any other action taking place.

[sourcecode lang="xml"]
<?xml version="1.0" encoding="utf-8"?>
<jnlp spec="1.0+" codebase="http://localhost:8080/" href="TestJnlp.jnlp">
<information>
<title>Jnlp Testing</title>
<vendor>ZQYVES</vendor>
<homepage href="http://localhost:8080/" />
<description>Testing of JNLP Application</description>
</information>
<security>
<all-permissions/>
</security>
<resources>
<j2se version="1.6+" java-vm-args="-esa -Xnoclassgc"/>
<jar href="logic.jar" />
<jar href="gui.jar" />
<property name="jnlp.versionEnabled" value="true"/>
</resources>
<application-desc main-class="com.jnlptest.TestJnlp" />
</jnlp>
[/sourcecode]
Note: I am not actually a java developer and the aforementioned application has been thrown together in a couple of hours to illustrate a point. Furthermore the aforementioned .jnlp file assumes that it will be served from localhost to localhost. Should you want to publish it and access is from two different locations you need to change any reference to localhost above to the IP address/hostname of the server hosting the application.

The aforementioned application has been packaged into two jar files, application.jar (that contains the GUI and bootstrap classes) and logic.jar that contains the authentication and authorisation handling class. The two jars where than signed with the following sequence of commands since the java settings will prohibit them from running otherwise. The first command creates the keystore that will be used in signing the jars and the next two actually performs the signing.
keytool.exe -genkey -alias zqyves -keystore jnlpappkeystore

jarsigner.exe -keystore jnlpappkeystore -storepass jnlpappkeystore -keypass jnlpappkeystore gui.jar zqyves
jarsigner.exe -keystore jnlpappkeystore -storepass jnlpappkeystore -keypass jnlpappkeystore logic.jar zqyves

Finally the three aforementioned files, the two jars and the jnlp where placed in the root of an apache server so as to be served. The following lines had to be added to the httpd.conf for the files to be served with the correct mime type.
	AddType application/x-java-jnlp-file .jnlp
AddType application/x-java-archive .jar
AddType application/x-java-archive-diff .jardiff

The application binaries and source code can be downloaded from the following locations:

Source code.

Binaries.

I hope this turns into a useful and interesting series of posts.

Best regards,

./Z

Tuesday 20 September 2011

LUHN-10 Error Detection

Hello All,

There comes a time in a pentest that passing a simple argument to an form field just won't reach its intended sink but will be rejected by a filter of some sort along the way. This is usually the case in loosely structured data such as credit card, imei numbers etc where the luhn-10 error detection algorithm is used to discard invalid data from ever reaching the back-end. This is performed with business logic validation against accidental errors as an incentive rather than security in mind.

For an explanation of the Luhn algorithm see http://en.wikipedia.org/wiki/Luhn_algorithm plus sample implementations for a couple of different languages. It also has a python oneliner for checking the validity of a given input against Luhn algorithm, however I hate onliners.

So i devised a couple of really basic python methods that can be used to either calculate the luhn check digit or check the validity of a given string.

[sourcecode lang="python"]
def calc_luhn( cl ):
if ( cl.isdigit() is False):
print 'Invalid input (not all digits)'
return null
else:
sumall = 0
for i in range(0,len(cl)):
d = cl[i]
if ( ( i % 2) == 0 ):
sumall = sumall + int(d)
else:
tba = str(2 * int(d))
if ( len(tba)== 2 ):
sumall = sumall + int(tba[0])
sumall = sumall + int(tba[1])
else:
sumall = sumall + int(tba)
if ( (sumall % 10) == 0 ):
return cl + '0'
else:
luhndigit = 10 - (sumall % 10)
return cl + str(luhndigit)

def check_luhn( cl ):
if (cl!=calc_luhn(cl[:-1])):
return False
else:
return True
[/sourcecode]

The two functions can be used as below:
>>> # Calculate the luhn digit
>>> l = calc_luhn('35478101234567')
>>> print l
354781012345671
>>> # Check for luhn algorithm compliance
>>> c = check_luhn('354781012345671')
>>> print c
True
>>> c = check_luhn('354781012345672')
>>> print c
False
>>>

Hope it helps someone

./Z

Sunday 24 July 2011

Error-Based SQL Injection in Oracle 11g

Hello all,

So, I was in the following situation the last couple of days after quite some time:

A friend of mine from the past called in a favor and pinged me for a get together over the weekend and some help in exploiting a SQL injection vulnerability he found. Plus he was buying pizza so...

The SQL injection was in the Login Form of a web application he was testing. After checking the year on the clock (twice) to see if I stepped in a time warp and found myself in 2001 again, we got together and  set off to produce a POC that would show the effects and risks of this vulnerability.

So, to move into the more interesting bits of the post, inserting a single quote in the username field yielded an "ORA-01756: quoted string not properly terminated". 

The logic behind the form was such that the SQL injection could not be used to bypass the authentication ala 1=1-- fashion and exfiltration via blind SQL injection was not possible due to the fact that both 1=1 and 1=0 where returning identical pages on the browser.  Timing attacks, as much as I like them, can be rather unreliable and experience has shown that they are not held to the same value when presented back to the interesting parties.

Since all error data were returned to the user browser I set of to exploit it via the typical  utl_inaddr.get_host_address such as the following:
' or 1=utl_inaddr.get_host_address((select banner from v$version where rownum=1))--

This failed with an "ORA-24247: network access denied by access control list (ACL)" . Since this was a new error for me I googled it to see what was the problem with my SQL query.

What I found was not amusing, there was not a problem with my query but with the database itself. Apparently in Oracle 11g someone actually thought it would be a good idea to revoke all network communication functions from any user other than SYS. This applies to the following packages:

  • UTL_TCP

  • UTL_SMTP

  • UTL_MAIL

  • UTL_HTTP

  • UTL_INADDR


as well as - by inheritance - to any other package/procedure/function that directly utilises any of the aforementioned packages. More info on that can be found in http://www.dba-oracle.com/t_ora_24247_network_access_denied_by_access_control_list_tips.htm and  http://www.oracle.com/technetwork/articles/sql/11g-security-100258.html . This enhancement also killed the UTL_HTTP.REQUEST out-of-bounds data retrieval and its derivatives such as HTTPURITYPE.

Researching more into the specifics of Oracle 11g lead me to the http://2009.confidence.org.pl/materialy/prezentacje/alexander_kornbrust_confidence_2009.pdf presentation given by Alexander Kornbrust of Red-Database-Security GmbH, however both of the functions he proposes using for returning user controlled output in the body of the error string, namely CTXSYS.DRITHSX.SN & ORDSYS.ORD_DICOM.GETMAPPINGXPATH were either not present on the database or my user had not execute permissions on them.

In a different section of the aforementioned presentation - the one for mass data exfiltration - I found another function that took a user supplied query as an argument and I thought I should have a go on that to see what I could achieve. This function was DBMS_XMLGEN.GETXML (more info on that here http://psoug.org/reference/dbms_xmlgen.html). Two minutes on my test Oracle 11g yielded the following query
select dbms_xmlgen.getxml('select "a" from sys.dual') from sys.dual;

which produced the following error "ORA-00904 "a": invalid identifier". "a" was something I could control in the following manner
select dbms_xmlgen.getxml('select "'||(select user from sys.dual)||'" from sys.dual') from sys.dual;

which will return the name of the user being used to connect to the database as the invalid identifier in the ORA-00904 error in the following manner "ORA-00904 "SCOTT": invalid identifier".

A quick check  - and troubleshooting as to the returned type of the function and the one being compared to ( "ORA-00932: inconsistent datatypes: expected - got CLOB" ) - showed that dbms_xmlgen.getxml was both available and executable by my user in the application I was testing. So the following was the final valid SQL injection string that allowed me to create a suitable POC for the app.
t' or '1'=to_char(select dbms_xmlgen.getxml('select "'||(select user from sys.dual)||'" from sys.dual') from sys.dual)--

I am assuming this is an issue to any function/procedure that can use a user supplied string as a part of a query and not specific to the aforementioned function. The real task is finding an accessible function to the user in hand. I must note that there is caveat to using the aforementioned method, the included in the double quotes "" as identifier has to be 30 characters or less or you are hit with the following error "ORA-00972 identifier is too long" .

./Z

BTW, if anyone knows of any other functions that can be used to return user controlled input  to a forced error message, please include them in the comments along with the default permissions set by the database in terms of execution rights.